Overview of disks, scanning
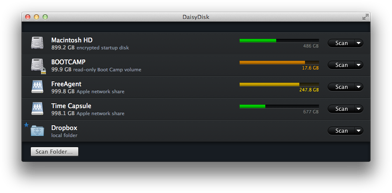
Upon launch, DaisyDisk displays the list of all volumes mounted on your Mac with your startup disk at the top:

You can easily tell which disks are running out of free space by taking a brief look at disk usage gauges. Green color means at least half of your disk is empty, red is often a clear call to action. The only number below the gauge tells you how much space is left and pointing it also reveals the used space number. Easy, isn’t it?

To find out what exactly takes up your disk space you need to scan it first. You can scan whole disks or individual folders. In the latter case scanning takes less time due to a smaller number of files.
To scan a disk click the Scan button next to the gauge or simply drag and drop the disk from Finder to DaisyDisk’s window or Dock icon. Folders can be scanned by clicking the Scan Folder… button or dragging and dropping them from the Finder.
It doesn’t really matter if you point to a folder or alias. Both will work perfectly.
Scan process usually takes 1 to 5 minutes mostly depending on the number of files and folders on your disk and has very little to do with disk size. Network shares, virtual disks or Time Machine backups often take longer to scan. DaisyDisk uses a highly optimized disk scanning engine to ensure the scan process takes as little time as possible, but we can’t overcome hardware limitations.
Starting from version 2.0 DaisyDisk allows you to scan multiple disks simultaneously. Just keep in mind that sometimes this process can be quite resource intensive.
Once scanned, the disk’s background changes color to clearly indicate that it can now be viewed.
You can make DaisyDisk “forget” scan results and free the RAM taken by the snapshot by selecting the Forget Scan Results command from the disk’s context menu.
If you frequently scan a certain folder, click on the folder’s icon to star it. Starred folders remain pinned to the list of disks even after you restart the application.
